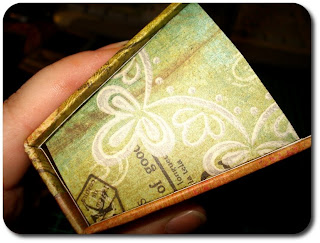
I made similar scrap paper holder few days ago. I just love it because it's nice and practical and you can put it anywhere you want. When I do cards or scrapbooking, there are always some pieces of paper left... with this holder I can have them all in one place instead of having them all over my working table. Since I promised a friend who visited me the other day that I will put a quick tutorial on my blog, here it is.
You can make it in different sizes - my basic cardboard sizes are:
14 x 10 cm for the back,
14 x 3 cm for the bottom and
14 x 7 cm for the front.
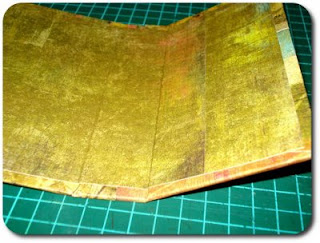
Cut the cardboard pieces and glue them to the back of the desired pattern paper - make sure you leave some space between them. Trim the paper about 2 cm around and trim the corners. Fold the edges and glue them down.


Cut the piece of coordinating paper that is a few millimeters smaller than the "core" you have in front of you and glue it down so you cover the edges. With you scoring tool, gently rub in the space you left between cardboard and try to put it into the final shape.


Now cut the paper for the side parts. I wanted the upper part of the holder to be wider than the bottom, so I first cut 6.5 cm long strip of pattern paper, cut it in half and marked 3 cm for the bottom (as that is the size of my bottom cardboard part as well), and 5 cm for the top. You want to get an isosceles trapezoid. On the sides with equeal lenght (in my case the 6.5 cm side) leave 1 cm for fold which you will glue down. (See the pics bellow, I can't tell that better). I distressed the back side of the trapezoids before I glued them as they were just too white for my quite dark background paper.


And that's about it. Of course you can embelish it as you want.


And finally, put some scrap papers in it. I'm going to make a bigger one and fix it on the wall to keep the bills that need to be payed in it. You can use it for other things as well, it's up to you.

Now I dare you to make your own and show it to me! :)


11 comments:
Super škatlica iz lepo skombiniranega papirja. Hvala za navodila. Tudi pri meni se kup papirčkov preklada po mizi in bi mogoče potreboval tako lepo skladišče.
Praktično in lepo! Kopiram, zagotovo. Enkrat :)
Super Holder, divno si ga uradila.
Hvala ti puno za tutorial
LP
Phoenixu
Uuuuu super za napotke in krasna ideja!
Super ideja, da o sami izdelavi in nazornih navodilih niti ne zgubljam besed. Pa krasne papirčke si notri pospravla.
lp natka
I, ideja!
Se moram spravit naredit kakšno, ker imam tudi polno takih ostankov.
Hvala, moi
Hvala Robi!
Zdej mi je pa čist jasno tud tist, kar mi prej ni blo.
Uživaj.
A.
Ni za kaj!
Zdaj je moja miza precej manj nastlana - pa škarje in svinčnike lažje najdem, mi jih ni treba iskat med papirčki :))).
Wow...you are so creative!!! Great blog!
Greetings,
Saskia
Super ideja!!! Ker nimam blog,ti bom enkrat v živo pokazala. Naredim ga pa zasigurno!
I love how versatile this scrap paper holder is.
Post a Comment